How To Enlarge Partitions in Linux
Skip the background and go to the guide.
My Pi-hole
I have an ad-blocking DNS server called Pi-hole on my home network. It’s running on a Raspberry Pi 3 B+, a tiny, credit-card sized computer. Due to the small size of the Pi, it’s impractical to use a standard 3.5″ or even 2.5″ drive for storage. Instead, the filesystem is housed on a micro SD card.
When I did the initial configuration of the Pi many moons ago, I dug up an old 4GB micro SD card I had laying around from my days behind a camera. The official Pi-hole documentation specifies the DNS server requires a minimum of 2GB free space, 4GB recommended. “Perfect”, I thought. What I failed to consider was that the Pi-hole documentation was not factoring the OS into that calculation.
I pressed ahead with an image of Raspbian OS Lite and installed Pi-hole seemingly without issue. What I didn’t know is that Raspbian OS Lite occupied nearly 2GB of space, while Pi-hole occupied another 2GB, leaving me no space for logging, DNS entries, cronjobs, or anything else.
Rookie Mistake
In a few days, I noticed that ads were creeping their way back into my browsing. The Pi-hole DNS server was offline. I tried to check the logs through the Pi-hole web interface, but none had been stored. I noticed sporadic errors while navigating the web interface, and restarting the DNS service via command line only solved the issue temporarily. That’s when I discovered my blunder. I didn’t have any free space left!
I purchased a new 64GB micro SD card and used the dd command to clone the old disk onto the new. You may think that I could have simply started from scratch with a clean image of Raspbian, but cloning the preconfigured files saved me the time of reinstalling Pi-hole. Not that it’s hard to install, but I wanted to try it out.
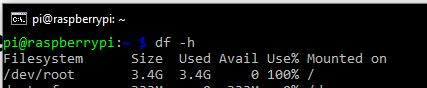
I had one last hurdle to clear, but it was the most complicated, which is why I’m writing a blog about it. The root partition of the drive was created to occupy 3.4GB of the disk. Since cloning with dd does not change the partition size to fit available disk space (in fact, it doesn’t change it at all), I would need to manually resize the root partition and file system to fit the new disk size.
The Process
There is some information to remember before starting this process:
- I did this via command line, so I didn’t have access to GUI tools like GParted
- Instead, I’ll be deleting the root partition (don’t worry, data is preserved) and creating a new, larger one with exactly the same starting sector and ID
- It’s very easy to make a mistake and lose all data with this method. Backups recommended
- Don’t try shrinking the partition. Use this method only for enlarging it
- The tools we’re using come on all Linux distributions, so the process should be universal
Identify the disk containing your partition
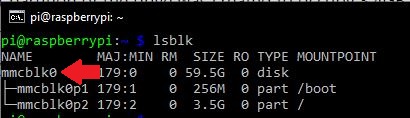
Use the command lsblk to find the name of the disk containing your partition. In this case, I want to resize the root partition. The root mount point is always “/”, so I can tell the partition I want to resize is called “mmcblk0p2”. That partition is contained on the disk mmcblk0, as highlighted below.
Run fdisk and select the disk
Next, run the program fdisk and select the disk from the previous step. Remember, you want to select the disk in this step, NOT the partition. Otherwise, you’ll get an error “No partition is defined yet!” in the coming steps.
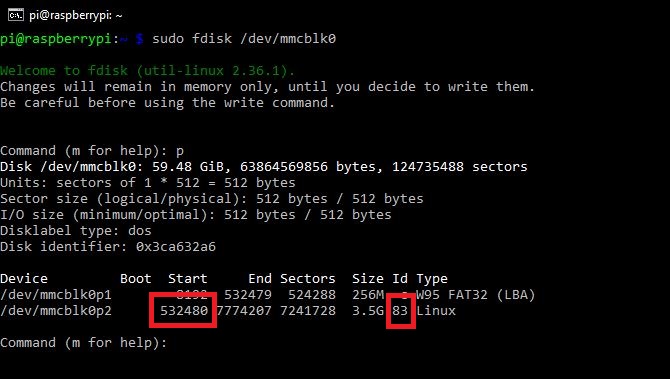
sudo fdisk /dev/mmcblk0Collect the starting sector and ID of your partition
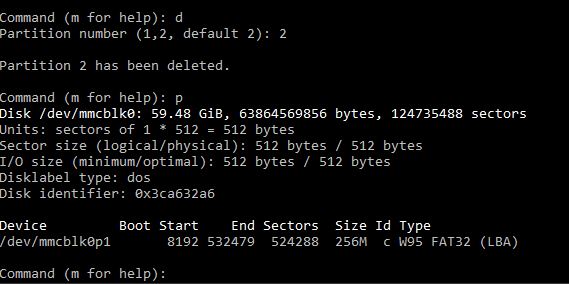
Once the disk is selected with fdisk, enter the command “p” to print the partition table. On the table, you’ll see all the partitions with their start and end sectors and IDs. Make a note of the starting sector and ID of the partition you’re resizing. You’ll need to enter them exactly in a moment.
Delete the partition
Once you have made a note of the start sector and ID of your partition, you can delete the partition. This is where the dangerous stuff starts, so keep a backup.
Enter the command “d”. You’ll be prompted enter a partition number, depending on how many partitions are on the disk. I want to remove partition 2, but you should enter the number of the partition you are resizing. Once the partition is deleted, you can enter the “p” command again to view the partition table and confirm the partition has been deleted.
Create a new partition
With the partition deleted, you can now enter the “n” command to create a new partition.
You’ll be presented with a series of prompts:
- Should the new partition be of type “Primary” or “Extended”? Primary partitions are bootable and contain the OS. Extended partitions are not bootable. Since I’m creating a partition that contains the OS, I selected Primary.
- Assign a partition number. This should be the same partition number that was deleted in the previous step. In my case, it was partition 2, so that’s the number I assigned.
- Enter the first sector where your partition will begin. The number you enter must match exactly the start sector of the partition that was deleted previously.
- Enter the last sector for your partition. You don’t want to match the previous last sector value, otherwise your partition would be the same size as before. We want it to be larger! I wanted my partition to fill the rest of the disk, so I entered the default value.
- fdisk asks if you want to remove the ext4 signature. If you don’t plan on wiping the file system, select No.
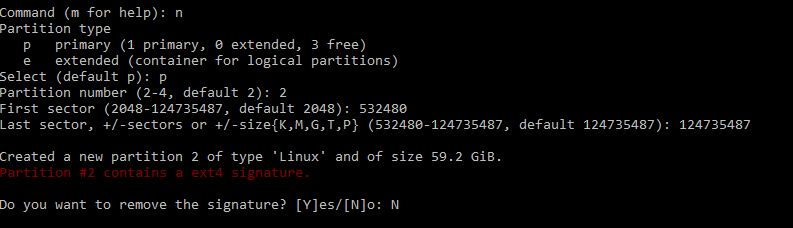
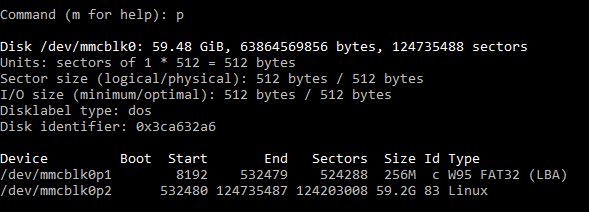
Enter the “p” command again to double check your work.
Commit the changes
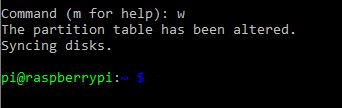
If you’ve done everything properly, you can now write the new partition you’ve created. If you are unsure or need to start over, enter the “q” command to quit without writing.
Otherwise, if you’re ready to write, enter the “w” command.
Reboot
You must reboot to reload the partition table. You could use a tool like partprobe to do this without rebooting, but rebooting is the safest way.
sudo shutdown -r nowResize the file system
You’ve resized the partition, but you need to resize the file system now. Fortunately, that’s very easy using the resize2fs tool. The following command will expand your file system to use the full size of the new partition you’ve created. Just remember to substitute the name of your partition!
sudo resize2fs /dev/mmcblk0p2
It may take a moment to process, but once complete, you’re all done.